Moving Power Broker from an old server to a new server should be fairly easy. Ensure that you do NOT decommission your old server for a few months should you need to gain access to it in the future if something is missed.
One of the first steps you would need to do is to make note of the existing mapped drive that Power Broker uses at an existing computer that’s still on the old network. If you go to a workstation, you can right click over a Power Broker icon, go to Properties, and then Shortcut, and this will tell you the target. In this example, we will use the P:\ drive.
WARNING: It is imperative that you continue using the same drive letter as it was before on your old server or you will lose access to all of your historical documents like eDocs or previous Liability slips or Policy Application forms.
You would then go to your old server and backup these directories:
\BRO
\Bulk
\CSIO – (bring only the last 2 months of backups, delete everything else in the CSIO folder that’s older than the 2 months)
\Images
\Images2
\Images3
Note: The folders mentioned are static folder names. Should this brokerage have changed the names, it’s best to log into Power Broker first as an administrator, go to Utilities, Define your Company Information, Software Directories, and double check if anything is different.
Once these are backed up, go to the new server.
On the new server, create a folder called \DATA.
Right click and share this folder to ‘Everyone’.
Click on ‘Permissions’ and ensure that ‘Everyone’ has full permission.
Copy the backed up directories to the C:\DATA directory.
Once copied, map a drive to the C:\DATA directory using the drive letter you found in a previously mentioned step. ( example P:\ )
Now that you have a P:\ drive, in Windows Explore browse to the P:\ drive and find a folder called \BRO and a file called BROW.EXE. Right click on this file, and choose ‘ Send To Desktop’ and ‘Create a shortcut’ . Rename this new icon to PB4. Still in Windows Explore, find a file called PowerTools, right click, send to Desktop, Create new Shortcut. Now search for a file called ‘Workstation.exe’ and run this file. Once installed, close Windows Explorer.
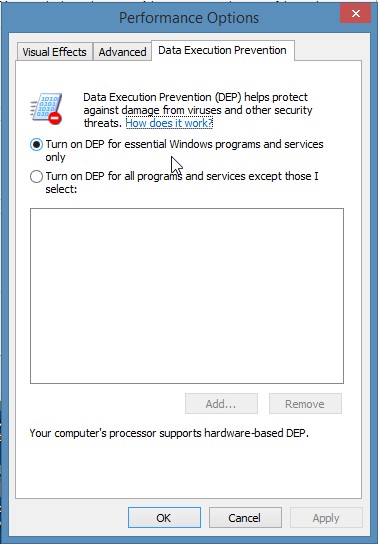
The ‘Fix Corrupted Database’ feature needs Data Execution Prevention to be disabled. One option is to go to your Control Panel, go to System, Advanced, Performace Settings and under the Data Execution Prevention, place a dot in the top circle. This will require a reboot of the server.
If you would rather not do this to your server, your other option would be to only run Fix Corrupted Database at a workstation following the same rule. One computer that plans on running this Power Broker Utility will need this setting to be disabled.
Double click on the new Power Broker icon, and it should bring you into a Power Broker log in screen.
At the workstation, you would need to disconnect the existing mapped P:\ drive, reboot, and remap a new P:\ drive to the servers C:\DATA share.
If you are adding a new computer to the mix, map the same P:\ drive as all of the other computers, and run Workstation.exe found in the \BRO directory.
NOTE: UNC paths are NOT supported. You must have a mapped drive!
If the old server was the computer that ran EDI – Ensure that you have Region set to English Canada and that you have Netframe 2.0-3.5 installed.
Once all of these steps are completed, test Power Broker to ensure that everything is working. If there was any confusion in these steps, one way of ensuring that everything is fine is to go to Utilities, and in the reports section, run the ‘Print Data Transaction Report’ to the screen for the past week. What you should see are entries made by staff for the past week. The next day or so, run the report again to ensure that all staff are mentioned in the report and that everyone is pointing to the correct copy of Power Broker.
If you have any other questions about this, please contact our technical support team.