

Pathway integration provides a clear path to more policyholders by empowering your insurance brokerage with a comprehensive suite of automated marketing tools that integrate seamlessly with Power Broker and get delivered in a polished, mobile-friendly message that connects with your target audience. Some examples of their work flow include prospect series, referral series, birthday emails, automated newsletters, home and auto renewal process, claims series, hazardous weather warnings, lost client series and much more…
For more details on the Pathway integration solution please contact them at:
Email: alek@pathwayport.com
Web: www.pathwayport.com
Phone: 416-361-3461 x113
The Power Broker integration module can be purchased by contacting Power Broker sales:
Email: sales@power-broker.com
Phone: 1-877-774-9444
Getting Started:
Congratulations on getting started with your new Pathway Integration. The next few steps should be relatively easy, but should you feel you need assistance, please feel free to contact our Power Broker support team and we will be happy to assist.
- Note: It is required at all workstations to have the short date set to default as shown in the example below.

Please contact Pathway first and they will assign you these unique identifiers:
- Pathway Security Key
- FTP Site Address
- FTP Folder
- FTP User Name
- FTP Password
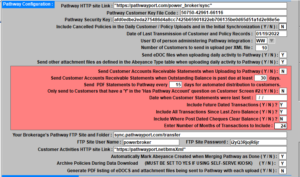
Once you have received these details, please open Power Broker, go to Utilities – Define Your Company Information – Integrations 3 tab. In the spaces provided, please complete the fields required as shown below.
Once installed, please open Power Broker, go to Utilities – Define Your Company Information – Integration 3 tab and complete the screen info:
Testing a Single Customer:
Check to see if your transmission is working successfully by testing on one customer screen, click on the Pathway Integration tab at the top left of the screen. It will prompt you to confirm the customer file that you are sending, click ‘Send File’.


To check if the client file has been transmitted to Pathway Integration, please browse to the file explorer and check the time stamp of the most recent XML file.

Then, go under the EDI tab, click on Transmit Customers to Pathway Integration. You will want to sync back to the last time your data was initially synced.


To schedule Pathway in Power Broker Task Scheduler please review setup below:
The Pathway Integration scheduler works with your Windows task Scheduler to do an automatic ‘send and receive’ to your Pathway Integration interface. While you are able to individually send the client file from the customer screen, by doing it through the Task Scheduler it will transmit the customer files all at once up to multiple times a day.
Follow link below for setup instructions:
http://power-broker.com/windowstask.htm
Variable XML Transmission from Power Broker to Pathway
For commercial brokerages, during an initial sync. to Pathway it was discovered that the standard 40 customers and their policies per XML file did not work properly as some of the commercial customer had 100 or more or less active policies. This resulted in some very large XML files (30+ megabytes) which are cnsiderably larger than what is realistic in terms of sending XML over the open InterNet.
As a result, there will be an option to choose the number of customer’s per XML file that can be defined in the Pathway Integrations section of Define Your Company Information. The default number is 40 but for brokerages that have large Commercial Books of Business, they may need to lower this number to 10 or 15.
(*NOTE: Power Broker version not yet released with this enhancement)
Sending Picture Files
A new option has been added to the “Transmit Customers to Pathway” option on the EDI menu that will allow you to upload all of the pictures and images that have been stored under the Digital camera icon on the Customer, Policy, Vehicle and Property screens to Pathway. Once you click on the “Send Picture Files” button a small message will be displayed asking you to confirm sending.

If you click Yes to confirm, then we process through the Power Broker databases uploading all of these digital camera images stored on every customer and policy in the database. An XML file is built, which is basically an index describing all of the files we are about to Upload. This index XML is uploaded to the pathway Web Services Portal. The file is stored in your \bro\pathway folder and looks like this ( they always start with the prefix ‘pict’ ).

The pictures and images to be uploaded are all written into the \bro\pathwayftp folder, and the CoreFTP software is used to transmit them to Pathway’s FTP Site. Once the pictures have completed transmitting you are asked to erase them from the \bro\pathwayftp folder.
Depending on the number of pictures stored in Power Broker, this transmission can take a long time to complete, and it might be best to leave this running when you leave the office at night so it can continue on its own for a few hours.
The pictures within Power Broker are the one stored under these Digital Camera icons
Customer Screen

Policy Screen

Vehicle Screen and Property Screen. Then the Digital Picture / Images screen looks like this and all pictures / images stored on every customer and policy are uploaded to Pathway.
