Using Scanning and Image Attachment in PowerBroker
The scanning/digital camera option allows you to attach scanned images and documents to the customers’ historical file or policy screens. The images are stored in a central location as defined in Power Broker under the Define Your Company Information screen but can be viewed, printed or emailed from the customer or policy screens.
Let’s begin!
WARNING: The Power Broker scanning integration requires a scanner that is Twain compatible, not all scanners have this Twain compatibility. Please check with your hardware vendor or go online and research the specifications of the scanner you plan to purchase and ensure that it is Twain compatible.
The first thing you will need is Power Broker Scanning feature key file. To find out if you presently have this key file, open Power Broker, and at the top, click ‘HELP’ and then ABOUT Power Broker for Windows’ and see if scanning is enabled. If not, then please call our sales line at 877-774-9444. The key file is a one-time charge of $500.00 plus tax. If you have seen this screen capture, then you know that you don’t have this feature and need to call our sales line.
Setting Up Power Broker
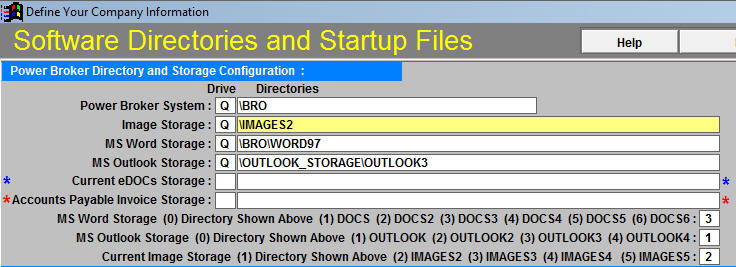
In Power Broker under Utilities – Define Your Company – Software Directories you need to enter in the path to the image folder that you have created on your Server. When you create this folder you will want to consider the future capacity that will be required for storing the images. The file can be on any drive that you wish, however we do recommend that you consider a different drive than Power Broker due to the file size that can result from storing images. In the future when the file becomes too large you can create new folders however they must be called ‘Images2’ and ‘Images3’ as shown below and as defined in Power Brokers’ Utilities menu. You then need to change the pointer from 1 to 2 or 3 as required.
If you wish to use PDF as a file format for storing images you will need to download and install Adobe Acrobat Reader which can be found on the Internet. This software needs to be installed on each workstation. You need to define the path for each user. Go to Tables – User Preferences and ‘browse’ to locate the Adobe executable file – acrord32.exe.

You will also need to complete the ‘User Image Holding Folder’. This is a folder that you have created on your local drive which houses temporary images. You link to these images using the customers’ Notes function. Once you have attached the image to the correct customer it then moves to the permanent storage folder on the server (as defined in Utilities – Define Your Company – Software Directories). You will then need to delete the image from the local drive as it will continue to reside there and ultimately take up space.
Also complete the View function – view based on (1) Viewer or (2) HTML.
TECH TIP: Choosing VIEWER will provide a much faster appearance of your saved document as choosing HTML will require Explorer to launch each and every time. HTML will NOT support TIF images when opening in Explorer.
Each Power Broker user will need to have the Tables – User Preference screen completed otherwise they will not be able to see any of the Adobe files that have been saved and will encounter errors when trying to launch these images. You may also need to edit the User Security question #50 if you want the user to have the ability to add or delete stored image files. Log out of Power Broker then back in again for all changes to take effect.
You are now ready to begin scanning images and/or documents.
There are a few different ways to scan and save an image into Power Broker. You can use the Scanning button found at top of the Policy screen, the Power Bar, the Camera Icon which is found throughout the customer and policy screens, and the Notes function. We will start with the Scanning button.
SCANNING BUTTON
Clicking on the < Scanning> button prompts the following screen to appear. From this screen you can change the type of document you save, the size of the document (dpi) and the color detail.
The first thing you need to do is to ‘Select Scanner’ source or ‘Use the scanning software’.
TECH TIP: If there is no scanner source, close out of Power Broker, open up a new Word document. Choose – Insert – Picture – from scanner or camera – if nothing appears here the scanner will not work in Power Broker. You will need to update the scanner drivers by going to the manufacturers’ web site. If it does appear in MS Word and will import the image, you need to check the user’s network rights for access in Power Broker.
You also have the ability to change the color from the original (default) to Gray, Black & White or True Color. True Color only applies if the image was originally in color.
At the bottom of the screen you have the ability to select the type of file format for the image. These file types also change the size of the file that is stored on the hard drive. For example, based on scanning the same image using the default color and dpi, the file sizes are as follows: PDF – 608kb; TIF – 736kb; GIF – 11kb; JPG – 50kb; PNG – 125kb. Please note you must use PDF or TIF if you are scanning a multiple page document and you wish to store it as one saved image.
Once you have made all your choices click on the ‘scan image(s)’ button and your scanner should start to scan your image. Once it has finished it will appear in the main screen. You then select ‘Attach Scanned Image(s)’ if you are happy with the image, if not, choose delete and scan image again. Once you have chosen ‘Attach scanned image’ the system will bring up the abeyance box for you to complete. This image can now be found and viewed from the Abeyance/Document screen in either Customers or Policies.
From the Abeyance\Documents icon, you can choose your image, then select ‘View’ and it comes to screen. You can from here Email it, Print it off or Send to the Clipboard. If you have saved your image in the PDF format, it will open up in Adobe and not the Viewer screen. You will need to use the Adobe functions if you want to email and/or print image.
If you are doing a Multiple page scan, select the defaults that you want, click on Scan. Once image has scanned in select the ‘Next’ button found at bottom of the screen. Continue in this manner until all pages have been scanned. You will see Page 1of 1, then page 2of 2 and so on. Then click on the ‘Attach Scanned Images’. This now saves a multiple paged document as one item. Please note that these multiple page scans can end up being very large so you may want to consider saving them as separate images if in fact you are going to email this file.
The use of the POWER BAR SCANNING BUTTON works the same way as choosing the Scanning button at top of screen.
CAMERA ICON
The Camera Icon is found throughout all the policy screens, plus many of the other screens – vehicles, driver, customer, watercraft, schedules, etc. Each camera icon has the ability to hold 4 images. These images can be imported by linking to saved documents or by scanning.
Choose the first empty field by clicking on it with the Mouse, this is now the active image field. (as indicated on screen in top right hand corner – ‘Selected: Image 1’). You must complete the fields in numeric order. Click on the field and it will tell you what the number is. Then choose your options whether you are scanning an image or importing an image that has already been copied to the image folder on the server and you now want to link the image to the correct Insured.
Choose Scan Image and the scanning screen appears, you proceed to select your options or go with the defaults, scan and save your image. You will now be able to see the stored image in the image box. From here you can view or print image.
Choose Import Image
The screen opens to the image storage folder that is on the server. From this screen you select the image that you wish to store back to the customers’ policy screen. These stored images have either been scanned in and saved to the image folder or digital camera images have been downloaded here. You click on the correct item, then choose ‘select’ the image now stores back into the policy screens.
If you have mistakenly added the wrong image to the customer or are just deleting the image, select the correct image box, then choose ‘Delete Image’ The first question box appears asking if you want to delete the image from this screen, you choose yes. The second box appears asking if you want to delete the image from the image folder (permanently deleted). If you mistakenly say Yes to the last question, the image is permanently deleted you would need to scan it in again.
These questions are subject to User Securities – Item #50 – Delete image file – Yes/No. You may not want all users having the ability to permanently delete images.
(Saying ‘Yes’ removes it from the Customer screen.)
(Saying ‘Yes’ permanently deletes it from the Computer.)
Choose View/Print Image
Select the image that you want to view or print by clicking on it, then choose view/print button at bottom. Screen.
From this screen you have the ability to Print, View, Send to Clipboard or Email this image.
Importing Pictures using the Notes function
From within the Customer or Policy screen you can link to a stored document using the Notes function. Click onto Notes and you have 2 different methods of doing this.
Method 1
Choosing the ‘File Folder icon’ (the first one in the top row) in the Notes screen opens up the link to the image folder you have on your local C drive (as defined in Tables – User Preferences). From here you select the image you want to move from your C drive, attach it to the customer file and at the same time it moves it to the network folder for images (as defined in utilities).
Once you have selected your image, click on ‘Add File’, it moves the image from the top menu to the bottom menu.
Note – it possible to attach more than one image to the abeyance note and Save as File Type PDF. The exception being that PDF; WAV; MP3 and HTM images are limited to one image per abeyance note.
Once you have the correct image, click on ‘Attach Image(s)’ at bottom, this moves it over to the network location plus writes a path in the note.
Click on Save Note and it is now stored in the clients Abeyance/Document screen.
You will need to go back to the local C drive after image has been attached and delete these files as they will not remove on their own and the file will continue to grow in size.
Method 2
Choose Notes from the Customer or Policy screens, complete the abeyance information at top, enter a description of the image you are saving then click on ‘Launch Using’. The option for images is ‘X’.
Then choose ‘BROWSE’ and it opens to the image folder on the Server (not the local C drive folder).
Select your image, click on OK and the path pastes back into the Notes screen.
Click on ‘SAVE NOTE’, this can now be viewed from the Abeyance/Document screen.
ADDING IMAGES USING – BATCH IMAGE ATTACHMENT
This feature is found under FORMS – Function menu – Batch Image Attachment
This function will link images that have already been scanned into the system into your temporary image holding folder (as defined in Tables – User Preferences).
The user would use this option over the Notes function if he had multiple images he wants to save to one client and he wanted to do it quickly. Each image saves as how it was scanned, either single or multiple pages.
Click into the menu, select the image you want to store, click on the ‘attached selected image’ and the pop up box appears asking for an abeyance date (if you wish) plus your customers policy number that you want to link the image to. If you do not know your policy number the system will pop up the policy database allowing you to search and select the correct number that way. Once you have selected the policy number and you are back in the image attachment menu, click on the ‘attach selected image.
You would proceed in this manner attaching each image separately. The images are stored under the customers abeyance/document screen found in customers or policies and can be viewed from there.
The PRIOR PAGE and NEXT PAGE buttons only work if you have scanned in multiple pages under one image.
Using the PDF Generator in Power Broker
If your office has our Scanning / Image Attachment / PDF Generator option installed, then you are able to create, send and save PDF images of the reports that you print in Power Broker. The PDF image of the report can be sent using MS Outlook to the eMAIL address on file for the customer in question. The same PDF file can also be saved to the customer abeyances file for future viewing or printing or followup.
In order to enable PDF Printing you must turn it on, in the Define Your Company Information Screen. You must also identify the location of your Adobe Arobat Reader software, in the User Preferences Screen. Once enabled, the printouts are sent to a PDF file and Adobe Acrobat Reader is the method you use to send the printout to the Printer, if a hard copy is required.
1. Enable PDF Printing in Define Your Company Information Screen
2. Identify the location of your Adobe Acrobat Reader software in User Preferences
Printing to PDF files instead of paper should allow you to significantly reduce your use of Laser Printers and PhotoCopiers and result in significant cost savings in purchasing paper, toner cartridges, file folders and filing cabinets and also in significant time savings in filing and retrieving physical paper.
3. Send a Form to a PDF file and save to the Customer Abeyance
Use the regular Print Buttons on the forms and applications screens to send the form to a PDF File, save the PDF to the Customer file and open Adobe Acrobat Reader for viewing the report and optionally printing the report.
4. Send a Form to a plain PDF file
Use the PDF button to send the printout to a pre-named PDF file in your default My Documents folder and save it to the Customer’s abeyance file.
5. Send a Form, Application or Dec. Page to a PDF file that attaches into an MS Outlook eMAIL
The MS Outlook button displayed on the last screen of all the forms and applications, allows you to eMAIL the PDF of the form to the eMAIL address specified on the associated Customer or Insurance Company record.
6. Sending Policy Change Forms by MS Outlook
Two methods are available. You must select your preferred method in the Define Your Company Information screen.
If you use the PDF Printing and Saving method, then the Policy Change Form is sent as an attachment to the eMAIL.
If you answer No to this option, then the Policy Change Form is inserted into the body of the MS Outlook eMAIL.
7. Sending the PDF Image of the Plan Paper Liability Slip by MS Outlook
This is the last example I will show, but as you can see many of your workflows can be automated and improved by eliminating the need to print and send paper, and replacing it with storing images of reports and sending them to customers, prospects and insurers by electronic mail.
Using Digital Signatures in Power Broker
If your office has our Scanning / Image Attachment / PDF Generator option installed, then you are able to create and use digital signatures wherever an Applicant; Producer or CSR signature is required on the various applications and forms throughout Power Broker. You will need to purchase at least one electronic signature pad for your office. We have developed the software using the Topaz Signature Pad, so strongly recommend that this is the pad that you purchase.
You would need to purchase the TOPAZ T-S460-HSB-R TOPAZ SIG LITE SIG CAPT 1×5 USB (HID) [T-S460-HSB-R]
NOTE: ( It specifically needs to be this exact same make and model for the integration to work)
Place the line below in your Google Search to find resellers of the Topaz Signature Pad.
TOPAZ T-S460-HSB-R TOPAZ SIG LITE SIG CAPT 1×5 USB (HID) [T-S460-HSB-R]
Quantity 1 – PRICE – $129.99
Here is the link to the Topaz Web site: http://www.topazsystems.com/
1. Collecting Signatures of your Producer’s and CSR’s
Have each Producer and CSR store their signature into Power Broker. This then allows them to insert their signature into the various applications and forms as required. The signatures are entered through the Producer Table Menu option and CSR Table Menu option using the Capture Signature button.
2. Insert signatures onto the Ontario Automobile Application
The last screen of all CSIO applications and forms contains the Signature buttons.
The “Capture Signature” button allows you to capture the applicant’s signature for insertion onto the application. The “Producer Signature” button will insert the signature of the main producer on this customer record (not policy) or the “CSR Signature” button will insert the signature of the CSR on this customer record (not policy). See section of Page 4 of the Ontario Automobile Application below showing the Applicant’s Signature and Broker/Agent Signature in place.
Below is a sample of the Capture Signature screen. The signature can be made Light, Medium or Bold. When you click on the “Write to Power Broker” button the signature is saved and control returns back to the screen that called the Capture Signature screen.
3. Insert signatures onto the Cancellation / Reinstatement Request Form
The last screen of all CSIO applications and forms contains the Signature buttons.
4. Insert signature onto Policy Change Forms
5. Insert signatures onto Declaration Pages or Policy Issuance
Power Broker also supports the use of electronic signatures on all policies or declaration pages that you issue. The example below shows the Habitational Declaration Page screen.
6. Insert Producer or CSR signatures into MS Word Documents using Word Integration
Use manual merge field to pull in Producer signature – <<PROD_SIGNATURE>>
Getting Started with Company Manuals Integration
If your office has our Scanning / Image Attachment / PDF Generator option installed, then you are now able to access Insurance Company Manuals, Forms & Bulletins directly from the Policy Screen in Power Broker. While there is a fair amount of setup involved, once established this will create a significant time savings and good electronic method of organizing these documents within your office.
For this to work, you must setup one or more separate directories on your File Server for each of your Insurance Companies, and then save the various Insurance Company Manuals, Forms and Bulletins into these Directories. You also need to go to the Insurance Company Table option and identify the File Server directories where the Company Manuals, Forms and Bulletins are stored. You can identify separate company manuals for Automobile, Habitational, Commercial and Commercial Automobile policies, and then that manual will be displayed based on the Line of Business you are working in.
1. The Insurance Company Table screen shows Location of Company Manuals and Bulletins
2. Selecting the Location of the Insurance Company Manual for Aviva Habitational
3. Identify the Location of Insurance Company Manuals for Economical Insurance. Please note that it is possible to add 4 additional manual links for each Insurance Company, to allow for other Manuals for Other Lines of Business, Other Provinces, or Perhaps the French Version of the Manual.
4. Selecting the Directory for Insurance Company Bulletins
Use arrow button to browse for location of insurance company manual
5. Identifying the Locations of the various Insurance Company Forms
6. Launching an Insurance Company Manual
To display an Insurance Company Manual click on the Green Manual Icon on the top of the policy screen, to show the list of available manuals for that company.
7. Launching Insurance Company Bulletins
To see the bulletins, click the new Yellow Bulletin Icon on the Policy Screen to bring up a list of stored bulletins for the Insurance Company on the Policy.
8. Launching Insurance Company Forms
To see the Insurance Company Forms list, click the new White Forms Icon near the top of the Policy Screen to bring up a list of stored forms for the Insurance Company on the Policy